We knew that we needed some show-stopping nails to wear to fashion week, so we came up with a mash up of trends that wowed the crowds. You may have seen these nails on Instagram, as Nail It magazine was kind enough to share them. It’s a nail art technique that doesn’t require heaps of artistic skill, but does ask for a little patience. It’s a look we’re calling the “shattered ombré.” HERE’S HOW TO SHATTER YOUR OMBRE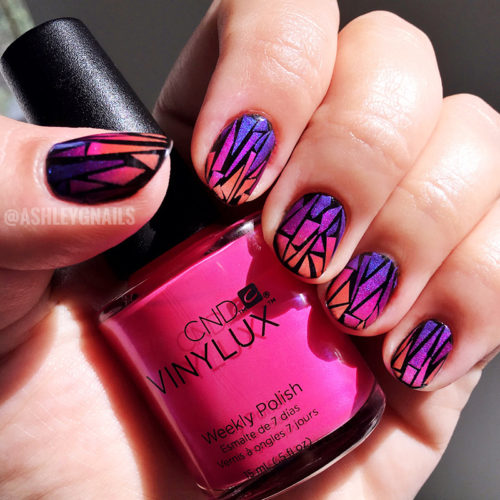
The general idea is that you create an ombré “decal” by using CND Vinylux topcoat and color, and then cut that decal into tiny shattered slivers, and place them into the dispersion layer of Shellac. You can change the colors used into whatever you’re feeling right now, but the technique stays the same.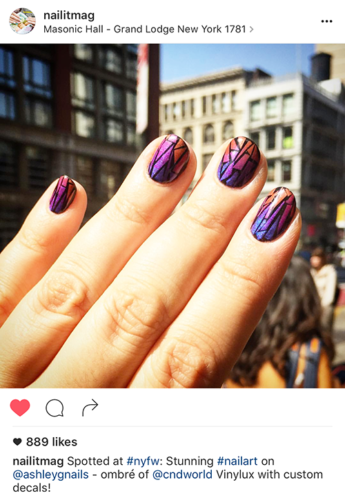
A few tips to make it your own: Maintain the ombré horizontally across the nail, meaning that the light peachy color should stay near other light peach pieces at the free edge. If you place like colors too far from each other, you can lose the ombré effect, (but will still end up with a cool mosaic look.) Or you can skip the ombré all together and just use different solid colors of Vinylux slivers over Black Pool Shellac and call it a stained glass window nail. Or you can ombré the Shellac underneath and reverse the ombré on the slivers and blow everyone’s minds. The sky is the limit.
You can pre-make the ombré decal in the morning and use it to give your clients and funky accent nail. Sadly, the decals get too rigid after more than a few hours, so they can’t be pre-made in bulk.
We can’t wait to see what you create with this technique! Please share with us on social media using the hashtag #TheNailscapeShatteredOmbre so we can oooh and ahhh over your creativity and skills. Happy ombré-ing!
HERE’S HOW TO SHATTER YOUR OMBRE
You might also like